OpenGL en Java (LWJGL)
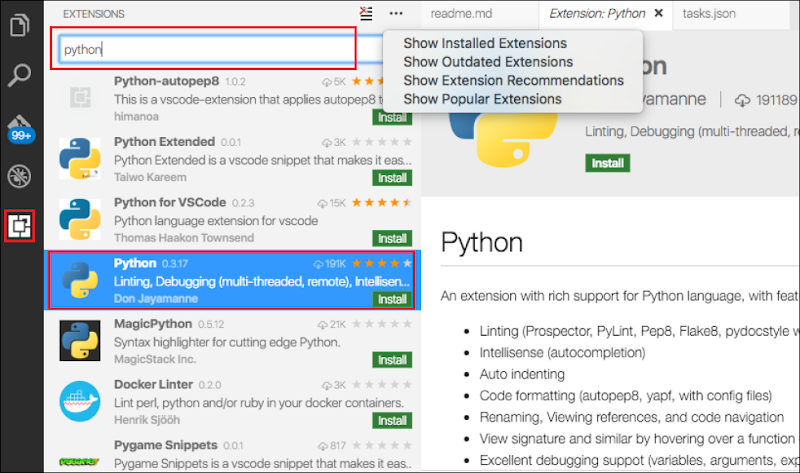
Para acceder a la librería OpenGL desde Java 8 primero debemos descargar LWJGL versión 3, este nos proveerá del acceso a la API Nativa OpenGL, para este tutorial usaremos el IDE Netbeans 8, primero creamos un proyecto Java Application, como este:

Una vez hemos descargado LWJGL 3 extraemos el archivo .zip en una carpeta de nuestra preferencia, para proceder a agregar el archivo lwjgl.jar a el classpath de nuestro proyecto, para ello hacemos clic derecho sobre el proyecto, seleccionamos propiedades.
En la categoría librerías, seleccionamos la pestaña compile y usamos el botón Add Jar/Folder para buscar el archivo lwjgl.jar, pulsamos OK para finalizar.

Lo siguiente que haremos será indicar donde se encuentran las librerías nativas .dll que son requeridas para usar OpenGL con LWJGL 3, en la misma ventana vamos a la categoría Run, usaremos la opción ‐Djava.library.path=”c:\lwjgl\native” indicando la carpeta correspondiente.

Con esto estamos preparados para escribir nuestro primer código:
import org.lwjgl.*;
import org.lwjgl.glfw.*;
import org.lwjgl.opengl.*;

import static org.lwjgl.glfw.Callbacks.*;
import static org.lwjgl.glfw.GLFW.*;
import static org.lwjgl.opengl.GL11.*;
import static org.lwjgl.system.MemoryUtil.*;

public class JavaOpenGL {

    // The window handle
    private long window;

    public void run() {
        System.out.println("Hello LWJGL " + Version.getVersion() + "!");

        try {
            init();
            loop();

            // Free the window callbacks and destroy the window
            glfwFreeCallbacks(window);
            glfwDestroyWindow(window);
        } finally {
            // Terminate GLFW and free the error callback
            glfwTerminate();
            glfwSetErrorCallback(null).free();
        }
    }

    private void init() {
        // Setup an error callback. The default implementation
        // will print the error message in System.err.
        GLFWErrorCallback.createPrint(System.err).set();

        // Initialize GLFW. Most GLFW functions will not work before doing this.
        if (!glfwInit()) {
            throw new IllegalStateException("Unable to initialize GLFW");
        }

        // Configure our window
        glfwDefaultWindowHints(); // optional, the current window hints are already the default
        glfwWindowHint(GLFW_VISIBLE, GLFW_FALSE); // the window will stay hidden after creation
        glfwWindowHint(GLFW_RESIZABLE, GLFW_TRUE); // the window will be resizable

        int WIDTH = 300;
        int HEIGHT = 300;

        // Create the window
        window = glfwCreateWindow(WIDTH, HEIGHT, "Hello World!", NULL, NULL);
        if (window == NULL) {
            throw new RuntimeException("Failed to create the GLFW window");
        }

        // Setup a key callback. It will be called every time a key is pressed, repeated or released.
        glfwSetKeyCallback(window, (window, key, scancode, action, mods) -> {
            if (key == GLFW_KEY_ESCAPE && action == GLFW_RELEASE) {
                glfwSetWindowShouldClose(window, true); // We will detect this in our rendering loop
            }
        });

        // Get the resolution of the primary monitor
        GLFWVidMode vidmode = glfwGetVideoMode(glfwGetPrimaryMonitor());
        // Center our window
        glfwSetWindowPos(
                window,
                (vidmode.width() - WIDTH) / 2,
                (vidmode.height() - HEIGHT) / 2
        );

        // Make the OpenGL context current
        glfwMakeContextCurrent(window);
        // Enable v-sync
        glfwSwapInterval(1);

        // Make the window visible
        glfwShowWindow(window);
    }

    private void loop() {
        // This line is critical for LWJGL's interoperation with GLFW's
        // OpenGL context, or any context that is managed externally.
        // LWJGL detects the context that is current in the current thread,
        // creates the GLCapabilities instance and makes the OpenGL
        // bindings available for use.
        GL.createCapabilities();

        // Set the clear color
        glClearColor(1.0f, 0.0f, 0.0f, 0.0f);

        // Run the rendering loop until the user has attempted to close
        // the window or has pressed the ESCAPE key.
        while (!glfwWindowShouldClose(window)) {
            glClear(GL_COLOR_BUFFER_BIT | GL_DEPTH_BUFFER_BIT); // clear the framebuffer

            glfwSwapBuffers(window); // swap the color buffers

            // Poll for window events. The key callback above will only be
            // invoked during this call.
            glfwPollEvents();
        }
    }

    public static void main(String[] args) {
        new JavaOpenGL().run();
    }
}
Este código genera la siguiente salida, si la vez todo esta correcto:

Mas adelante explicaremos como funciona todo y que debemos hacer para crear gráficos y salidas mas complejas, los espero en la próxima.


Comentarios
Publicar un comentario